Welcome Center

Welcome to
Interactive Brokers!
Interactive Brokers is built for investors who value control, transparency, and global access. Whether you are placing your first trade or executing advanced strategies, your account is designed to scale with your experience without forcing you to change platforms as your
needs evolve.
Start with simple tools and guided workflows. As your knowledge and activity grow, unlock professional-grade trading platforms, broader market access, and advanced capabilities used by active traders worldwide.
Your account structure stays the same. Only the tools you choose to use change.
This page outlines clear setup paths for different experience levels. Follow the steps most relevant to you, complete them in order or as needed, and return at any time as your investing approach develops.
Choose the tab that best describes your investment experience and objectives.
Getting Started with Investing
Interactive Brokers is built to support investors at every stage. Start with simple tools and expand into more advanced capabilities as your experience grows.
Follow these steps to get set up and place your first trade. Complete them in order and return to any step later as your needs change.
STEP 1: Fund and Access Your Account
Fund your account to place your first trade. Funding is completed through Client Portal and supports several secure methods.
Use a bank wire or ACH transfer to add funds and begin trading.
Related Links
STEP 2: Trading Permissions and Market Data
Trading permissions determine which products you can trade and in which markets. Your account includes default permissions that allow you to begin investing right away.
Market data subscriptions are optional. If you do not subscribe to real-time data, delayed market data is available at no cost.
You can update trading permissions and market data at any time as your needs change.
STEP 3: Select a Trading Platform
Start with platforms selected to support essential account management and trading, while keeping complexity under control.
 Desktop
Client Portal
Manage your account, review balances and positions, and place trades using a mobile-optimized web-based platform that requires no download.
 Mobile
IBKR GlobalTrader
Trade stocks and ETFs across global markets using a mobile-first app designed to keep trading focused and straightforward.
STEP 4: Learn or Trade
Paper Trading lets you practice trading with simulated capital using real market data. All new accounts include a Paper Trading account.
Interactive Brokers offers free educational resources to help you understand markets, products, and order types.
Related Links
STEP 5: Expand When Ready (Optional)
As your experience grows, you can explore additional platforms, advanced tools, and deeper customization options.
These resources are optional and available at any time.
Optional Resources
Build on Your Investing Experience
As your investing experience grows, Interactive Brokers gives you more control, broader market access, and tools suited to more active strategies.
Follow these steps to refine your setup, select the right tools, and trade with greater precision. You can complete them in order and adjust settings at any time.
STEP 1: Fund or Transfer Assets to Your Account
Fund your account to begin trading at Interactive Brokers. You can add cash or transfer existing positions from another broker.
Funding and transfers are managed through Client Portal and support a range of secure methods, including bank transfers and full or partial position transfers.
If you are transferring positions, submit your transfer request through Client Portal and coordinate with your current broker to authorize the transfer.
STEP 2: Configure Trading Permissions and Account Settings
Configure your account to match the products, markets, and strategies you plan to trade. Trading permissions define which instruments you can trade and where you can trade them.
You can request or modify permissions by product and country through Client Portal. Changes take effect once any required risk disclosures are completed.
As your strategies evolve, you can update trading permissions and related account settings at any time.
A Note About Options Trading Permissions
Options trading permissions are structured in levels based on strategy complexity and risk profile. You can request the level that aligns with your experience and objectives.
Permissions range from covered strategies to more advanced spreads and uncovered positions. Approval is subject to your financial profile, investment objectives, and regulatory requirements.
If needed:
Request Options Trading Permission
Related Links
STEP 3: Choose Your Trading Platform
Select platforms designed to support more active trading, advanced order types, and deeper market insight. These platforms give you flexibility to trade across devices without changing how your account works.
 Desktop
IBKR Desktop
Analyze markets, manage positions, and execute trades using an integrated desktop platform built for active investors. IBKR Desktop combines essential trading tools with customizable layouts and advanced order functionality.
Related Links
 Mobile
IBKR Mobile
Monitor markets, manage positions, and place trades using a full-featured mobile platform. IBKR Mobile supports advanced order types, alerts, and integrated tools so you can stay connected when away from your desktop.
Related Links
STEP 4: Trade with More Control
With funding in place, permissions set, and platforms selected, you are ready to trade using more advanced order types and risk management tools.
Interactive Brokers supports a wide range of order types and execution methods, allowing you to manage entry, exit, and exposure with greater precision.
Order Types and Execution
Use advanced order types to help control price, timing, and risk. These tools are available across IBKR trading platforms and can be adjusted as your strategies evolve.
Examples include:
- Limit and stop orders
- Bracket orders
- Conditional orders
- Algorithmic order types
Risk Management and Monitoring
Monitor positions, margin requirements, and portfolio exposure in real time. Built-in risk tools help you understand potential outcomes before and after trades are placed.
You can:
- Track margin usage and available buying power
- Review portfolio performance and exposures
- Set alerts to stay informed of market or account changes
Research and Market Insight
Access integrated research, news, and analysis to support more informed trading decisions. You can subscribe to research and news services based on the markets and products you trade.
Charting and technical analysis tools are available across platforms, with optional integration with TradingView.
Related Links
STEP 5: Expand and Refine Your Approach
As your strategies evolve, Interactive Brokers offers additional tools, platforms, and customization options that you can adopt at your own pace.
Nothing in this step is required to begin trading. These resources are available whenever you are ready to explore more advanced workflows or markets.
Additional Platforms and Tools
You can expand beyond your initial platform choices to access deeper customization, advanced analytics, and specialized trading workflows.
Optional platforms include:
- Trader Workstation (TWS) for advanced trading strategies and market depth
- Additional platform tools for options, futures, and multi-asset trading
Strategy Development and Education
Refine your trading approach with educational resources designed for active investors. Courses, tutorials, and walkthroughs allow you to deepen product knowledge and explore new strategies.
Education is optional and available on demand.
Platform Guides and Documentation
Access detailed platform guides, documentation, and release notes to understand new features and workflows as they are introduced.
Interactive Brokers is built to support investors as they progress, from their first trades through more active and complex strategies. You can expand your tools and capabilities when it fits your trading style.
Access Advanced Trading Capabilities
Interactive Brokers provides the depth, control, and global reach required for complex strategies and active trading. This path highlights the core setup steps and platforms most relevant to experienced traders, while leaving your workflows fully customizable from the start.
You can complete these steps in any order and adjust your configuration as your trading needs evolve.
STEP 1: Fund or Transfer Assets
Before trading, fund your account or transfer existing positions from another broker.
Interactive Brokers supports both cash funding and in-kind position transfers, allowing you to move assets while maintaining market exposure.
Related Links
Note
When transferring positions, submit your request through Client Portal and separately authorize the transfer with your current broker.
STEP 2: Configure Trading Permissions and Market Data
Advanced strategies require precise control over products, markets, and pricing.
Trading permissions define which asset classes and regions you can trade. Market data subscriptions provide real-time pricing and market depth where required.
You can:
- Request permissions by product and country
- Subscribe to exchange-level market data
- Modify permissions and subscriptions at any time
STEP 3: Select Your Primary Trading Platforms
Choose platforms designed for speed, customization, and multi-asset execution. Platforms can be used concurrently without changing account structure.
 Desktop
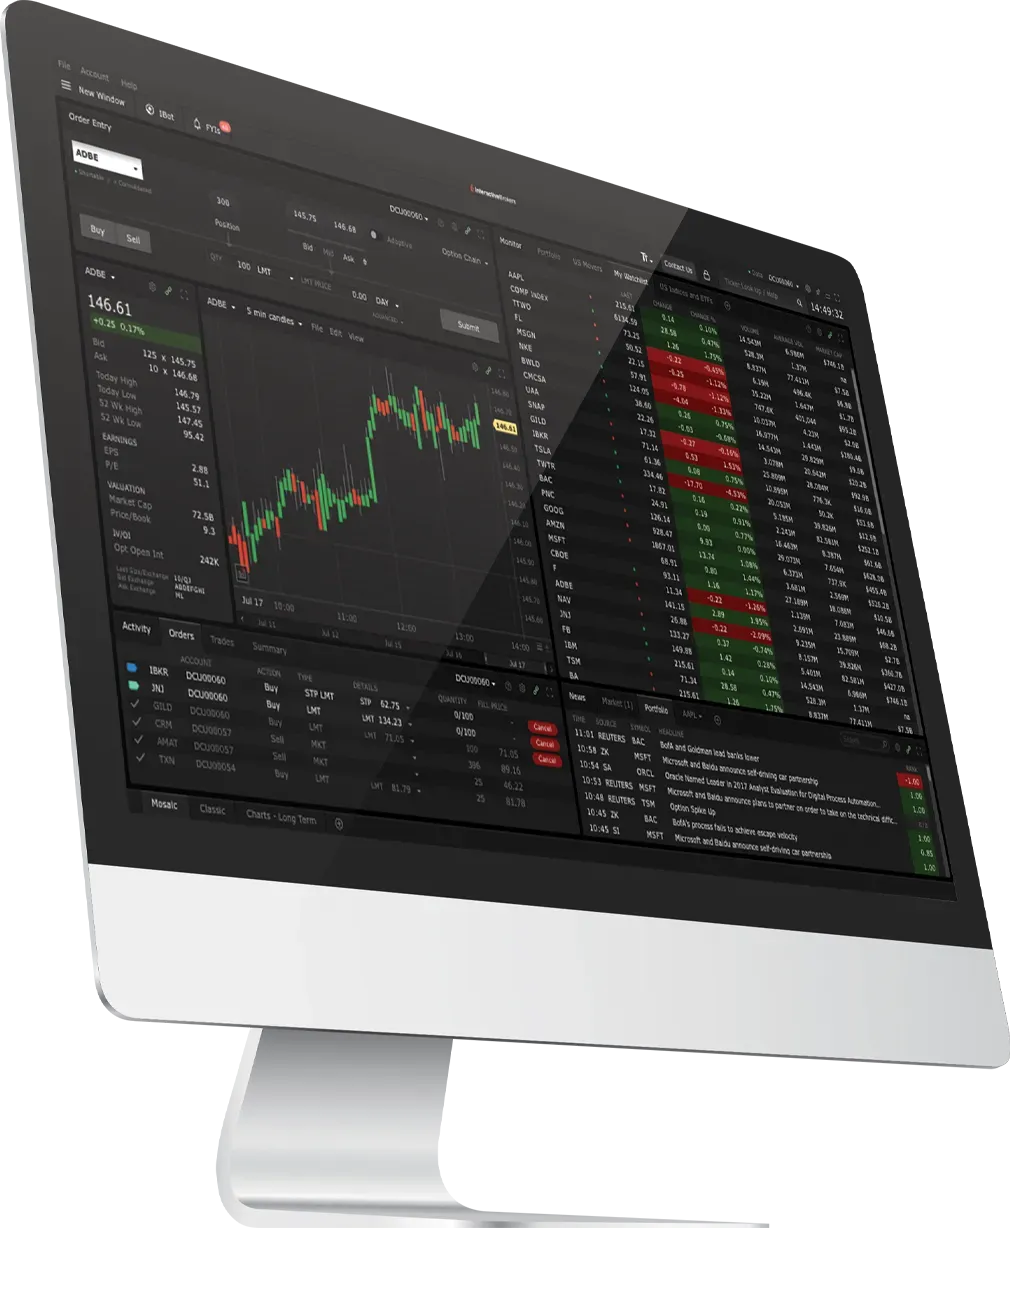
Trader Workstation (TWS)
Trade global markets from a single, configurable desktop platform built for advanced strategies. TWS supports complex order types, options analytics, market scanners, and real-time risk monitoring.
Download Trader Workstation (TWS)
Related Links
Mobile
IBKR Mobile
Monitor markets, manage positions, and execute trades using a full-featured mobile platform. IBKR Mobile supports advanced order types, alerts, and portfolio monitoring for active traders.
Related Links
STEP 4: Execute Advanced Strategies
Interactive Brokers supports advanced order types, options strategies, and execution tools designed for precision and risk control.
Capabilities include:
- Advanced and algorithmic order types
- Multi-leg options strategies
- Real-time margin and risk monitoring
- Integrated portfolio and exposure analysis
Related Links
STEP 5: Extend and Customize (Optional)
Further tailor your trading environment with integrations, automation, and advanced configuration options. These tools are optional and available when your workflows require them.
APIs and Automation
Develop custom workflows or integrate trading into external systems using Interactive Brokers APIs.
Charting and External Integrations
Connect your Interactive Brokers account to third-party platforms such as TradingView for advanced charting and analysis.
Documentation and Updates
Access platform guides, technical documentation, and release notes to stay current as tools and features evolve.

Built to Grow with You
Interactive Brokers is designed to support investors at every stage. You can start with essential tools, add capabilities as your experience grows, and access professional-grade platforms without changing how your account works.
Your setup is flexible. Your costs stay competitive. Your access remains global.
Whether you are placing your first trade or executing complex strategies, you control how and when you expand.
Please return to this page at any time as your investing approach evolves.